Tales of my furniture makeovers and great DIY projects...

Saturday, June 23, 2012

A great set!

Do you ever have one of those Craigslist finds that really just seem to be too good to be true?  Well, this was mine. 

I had just gotten to work and while I was checking messages and returning calls I decided to browse Craigslist.  Then, I saw them.  The ad simply was titled "china hutch and buffet" but the price was low enough so I opened up the ad.  I immediately sent an email to the seller inquiring about them 100% certain that he would tell me, so sorry, already sold.  But, he answered right away.  They were still available.  He had someone coming at 3:00 that afternoon to look, but if I wanted and could come before then, I could!  So, like any furniture addict who is at her full time job and dressed in a suit and heels, I took an early lunch hour and RAN.  Now, before everyone yells at me about safety issues, the guy told me they were already sitting outside in his driveway.  I figured I could do a "drive by" to asses the situation.  They were outside and he lived in a busy neighborhood, so out of the truck I hopped!  I made my quick purchase, he loaded my pick up truck and back to work I went. 

This is what I looked like parked in the parking deck.  I seriously just prayed nobody would steal them in the few hours I had left!


I'm pretty sure most people have given up on me!

Here is what I got:


AND!


First, don't get excited about the wheels, they didn't go with the pieces.  The original wooden ones had broken and the man just replaced them with up to date ones that totally didn't match, so I took them off. 

My biggest regret is that my pictures of this whole redo suck!  They sold so lightening fast that I didn't get good ones.  Boo.

I stripped and sanded the top of the sideboard and restained it a lovely dark walnut.  I painted the rest Old White, distressed heavily, then topped with clear wax.  Seriously, I loved this.  I should have kept it.  But, I didn't and now I'll have to pine away for her the rest of my life.  Or, maybe not.  Can you believe after looking for one of these for over a year, the same day this sold I found another one for a steal! 

Then, I took the doors off the china cabinet, painted the inside Louis Blue, the outside Old White, again heavily distressed it, topped with clear wax.  I cleaned the glass real good reattached the door.  Sigh, I will be pining for her.  Pine.  Pine.  Pine. 


And, the sideboard:


Okay, maybe I will still pine away.  Sigh.  I love this. 

If you are anything like me and were never able to form a meaningful relationship with poly, dark wax on top of a stained wood top is pure heaven.  Smmmmoooootttttthhhhhhhhh!  It just adds an additional richness to the color and I'll probably never use poly again.

The good news in all my pining is that the same lady bought both pieces and they will go in her dining room.  She lives in an old farmhouse that is in the middle of a renovation and she is trying hard to keep the reno as true to the style of the house as she can.  They will be so happy there!

Sharing at:


Monday, June 18, 2012

A few small projects

I recently had an unexpected day when Enma woke up with a gloopy, sloppy case of pink eye.  I knew she wasn't feeling too hot, so this was the perfect excuse to not push ourselves.  It was especially awesome because it was pouring all day, which was another perfect excuse to not have to do anything.  Not do anything?  Hmmmmm.  I used to be able to do nothing.  What happened to me?

So, I spent the day finishing a few small projects.  And, when Scooby Doo was no longer entertaining (yes, don't ask me why, but my 4 year old has an uncanny obsession with Scooby Doo) Emma joined in the craft making!  She was very intent on her work:


I had some extra slabs of wood leftover from a name sign I did and from some pallets, so we just started painting.  Emma made this all by herself.  The ONLY thing I did was outline the flower in pencil because I had originally planned on using this.  But, she filled it in on her own.  Oh, I did tell her how to spell Mommy, but she knows all her letters and wrote it on her own.  This sign is now proudly hanging on my office wall and I know it's one of those things I will own FOREVER.


And, for anyone familiar with ASCP, yes this is that.  That beautiful pink is Emperor's Silk mixed with Pure White and the minty light green is Antibes Green mixed with Pure White.  I'm not sure what Emma enjoyed most, making the colors or actually painting!

Next, I finished up a chair that I had painted a few weeks ago, then it just sat because I just didn't know what to do with it.  A friend of mine had given me this kids chair a while ago.  It came from her grandparent's home.  They were sadly clearing out thier house and before the yard sale, she snatched up this chair.  She gave it to me thinking I could do whatever I wanted with it.  So, after reading Winnie the Pooh's 'Giving is the Best Gift' about 50 nights in a row, I decided to practice what I preach.  I knew this had been a hard time for my friend, and having lost my Grandmother last year, I know how nice it is to have some sentimental things.  My friend has a 6 year old daughter, so this was perfect for her.  I knew the color was right, she loves this color! 

 I have to say, I had SO much fun doing this.  This was the relaxing, fun, creative part of painting furniture that I had kind of lost.  It has become more and more of a job to me and it was nice to do something creative, that nobody was expecting or waiting for and there was no pressure at all.  I've never been an artist and you don't have to be to paint furniture, just have some sort of vision.  But, as I was doing this chair, I felt more artistic and became very brave and daring when I added the flowers...all free hand!  Here it is:


The best part of sanding and distressing something after you paint is that it doesn't have to be perfect and precise.  The flowers aren't measured or perfectly placed, I just eyed it.  My friend was very happy (and suprised!) to have such a cute chair that will remind her of her grandparents when she looks at it.  And, best of all, Abbie loves it!


I don't have any before pictures, but it was just your basic, run of the mill, plain wood chair.

We had such a nice day, I was kind of hoping the pink eye would stick around or perhaps travel to me, but alas, no such luck.  Back to work the next day...


Sunday, June 10, 2012

Another use for pallets!

Through Pinterest, I've developed a fascination with pallets.  The best thing is, you can find them a lot of places, plus it's reusing old wood that would probably be sent to the dump or burnpile.  My first project was this pallet turned shelf/wall hanging:


This filled a space in my kitchen by my table that I have racked my brain trying to fill.  I love it because it's so unique and houses all my pictures in a great way.  Every person that walks into my house remarks how cool it is.

Then, we made this outside pallet table for our patio redo:


It's perfect because it's on wheels and we can just roll it everywhere!  Plus, it matches our great Adirondak chairs.

This weekend I was making a pallet shelf for someone who just loved mine and we had to do some fancy cutting to make it work.  I saw the beginnings of another great project!  All I had to do was attach a board across the front to hold in the bottles and voila (!) a pallet wine shelf to hang on the wall.

I really liked the color of this wood and didn't really want to stain it.  But, it needed something.  So, I grabbed my Paris Blue ASCP and watered it down.  I then lightly painted around it to give it that perfect beachy look.  I was going to paint the whole thing but as I was painting decided to leave the back part the original wood.  It just looks so beachy rustic.  Is that a design style?

So, here it is:


I didn't hang it.  I actually have no wall space for this, but couldn't resist making it!  Surely, I will find someone who loves it!


It's pretty large, could probably handle about 8 bottles of wine.  This is so cool...I need to go find some wall space, NOW!

Sharing at:


Saturday, June 9, 2012

What's a table without chairs??

Right?  When I first found and redid this table it really didn't occur to me that selling it would be a problem without chairs.  I mean, who doesn't like to scour second hand stores looking for chairs?  Well, suprisingly, some people don't.  They like sets.  So, a set is what I decided to give them.

So, I scoured second hand stores, Craigslist, and yard sales.  I found these on Craigslist, but they were a bit too expensive for my taste.  So, in true form, I emailed the seller and offered a crazy low price with the promise of picking them up that day.  I would say this works maybe a fraction of the time, but if you don't ask, you never know.  Luckily, it worked in this case.  The seller just wanted them gone and wanted to make a bit o' cash.  They don't exactly match that gorgeous dark walnut top and Pure White body, huh?


But, look at them, classic style and solid wood.  Perfect.  The first thing I did was strip and sand the seat of the chairs so they could be restained that beautiful dark walnut color.


I think everyone in my neighborhood is probably getting sick of hearing my sander!

So, I stained and painted, stained and painted, well you get the gist.  Looks like a seemingly small job, not a lot of painting to do.  Wrong.  Chairs are a total pain.  I will probably not do anymore for a while unless I can spray them because they are TIME CONSUMING!

But, it was definately worth it.  After some distressing and waxing, they turned out so beautiful and updated.


And, talk about a set.  This set looks like it was made together.  Remember the table from before??


Now, it's a beautiful dining set.  Hmmm, would I be a horder if I had two different table sets in my kitchen?  Is that how it begins??


Sharing at:


Monday, May 21, 2012

Ugly Duckling=Gorgeous Table

Just want everyone to know, except for the link at the end of my post about where I'm sharing this entry, there are NO other intended links.  For some reason, Blogger is adding links to random words, I don't know how this happened and I'm certainly not being paid for it.  So, don't click on any links...except Primitive and Proper and Miss Mustard Seed of course!


I was aimlessly wandering through Goodwill a while back looking for a desk that I could redo for myself.  No such luck, BUT, this table kept calling my name over and over.  It was SOLID.  It was definately not a cheapy dinette table, but a real heavy piece of oak.  It just had that plain, orangey tinge brown color.  I don't know why, but I just don't like that color stain.  It just seems dated.  I kept walking away but found I couldn't leave the store without it.

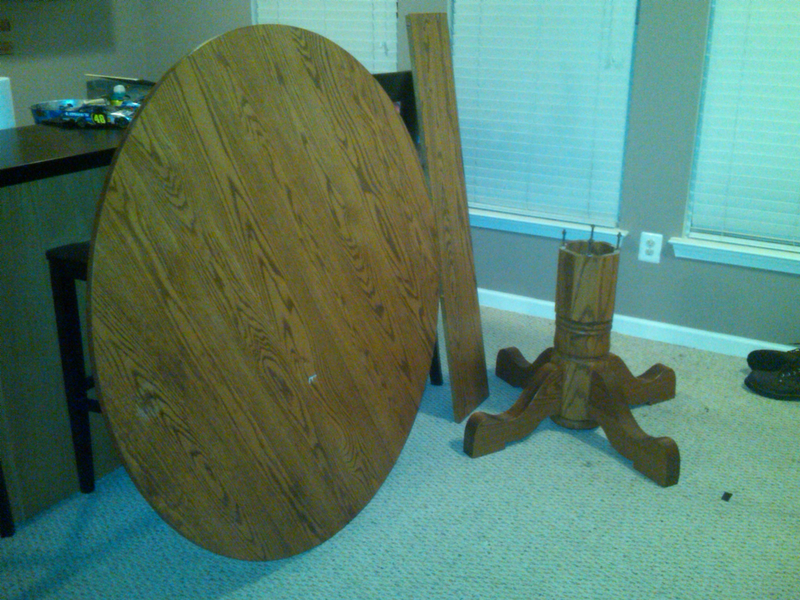
I had a small disagreement with the guy who loaded it for me.  I knew, knew, knew, the top could be easily taken off the base if we just opened it up where the leaf was and exposed the screws.  But, nooooooooo, he wouldn't believe me and wouldn't dare attempt it.  So, I drove home with this monster table right side up in my pick up.  Really, I felt like an idiot.  I had to pull up to daycare like that.  Maybe by now people are used to seeing me like that?  As my husband starts to unload and we realize it isn't going to fit through the door, I suggest taking the top off again, then prepare for him to belittle me like the Goodwill man did.  But, he did it and sure enough I was right!  Here it is right inside the door:


And, look at this top, not the best color, but look at the grain:


So, I stripped the top and sanded to reveal a beautiful raw wood surface.  I then used Rustoleum Dark Walnut Stain, applied it with a brush, but then used a rag to wipe in and wipe off excess.  This stain is dark and really only requires one coat.  It also dries pretty fast.  I wanted to do something a tad different but you really can't tell from the pictures because not only does my camera suck...so do I at taking pictures!  First, I took a hammer and a huge chain and beat up on the table a bit so the dark stain could settle into the knicks and grooves. After the stain fully dried, I sanded with a 220 grit paper by hand, not too  much but made the stained top a bit distressed also.  I then topped with Annie Sloan dark wax.  I love it!  I'll definately do this again on my next wood top, just makes it so rustic.

Then, I painted two coats of Annie Sloan in Pure White, distressed, then topped with clear wax. 

It really is amazing how furniture can be transformed.  This only reinforces to me that I will never again buy any piece of wood furniture brand new.  That's just crazy talk.  I'll keep my money for myself, K?

Here is how it turned out:


This is with the leaf in.  You could comfortably seat 8 around this table, it's that big!


This is without the leaf.  Please excuse the crazy glare.  Grrrrrrr.......


And, the pretty pedestal.  The distressing really brings out the beautiful detail. 


And, that beautiful wood top.  I love this color.  Is it wrong to be this happy about a color of stain?

Now, it's a solid, updated, and useful piece of furniture.  :)

Sharing at:


Sunday, May 13, 2012

Outside Spaces...and another pallet project.

First of all, Happy Mothers Day to all the Mommy's!  We had a pretty quiet one here, had all the fam over for breakfast, then had a lot of relaxing while sitting outside.  It was a gorgeous day!

Speaking of outside, we've been busy the last few weekends sprucing up our outside instead of inside.  We have a great deck off our sunroom/kitchen area and below that a concrete patio.  Until now, they've been OK, just OK.  The concrete patio was pretty much a storage area for every Little Tikes toy you can imagine, but as Emma is getting older, the need for those toys lessen, so we actually have some grown up space back!  Our deck has had a nice table that we bought several years ago, but just always had blah beige cushions and a blah beige umbrella. 

When Target had a rockin' sale a while ago I was able to get the cushions for a steal.  I really liked the idea of a solid color, but couldn't decide which one to pick.  So.....why pick one?  I just picked all the ones I liked and I think they go great together:


We had some pretty (at one time) flower holders that had faded beyond faded.  So, we spruced them up with a coat of black spray paint.  Then, the only planters we had that would fit were a dull army green with faded spots.  Enter the black spray paint again...


Here's a closer look:


If you've noticed that my townhouse backs to the most beautiful protected wetlands EVER you're right.  I never realized when we bought this house how lucky we were...until now, of course!

Now, for the concrete patio...it all started with my fascination with a pin on Pinterest about all of the fabulous uses for old discarded pallets.  I saw an outside coffe table and loved it!  We cut ours in half because our space isn't that big, but can you belive we went from this:


(you can see where we sliced it in half!)

To this:


All we did was buy some 4x4's to seperate the two pallets, a bunch of L-bracket thingys (my husband did that part), 4 wheels for the bottom and my favorite Rustoleom stain.

I searched for a long time for Adirondak chairs that I liked and were affordable, which was hard.  The one's I really liked liked were a few hundred dollars a chair, so I ended up with 2 chairs from Home Depot.  They were on sale for only $39 each, but of course had to be put together and then stained that fab dark walnut color, not to mention a protective coat of poly.  While at Home Depot I passed a bin with outdoor pillows on clearance for $11 a pillow and these coral pillows just screamed BUY ME!  You can see why, huh?


The total package:


With my flowers in the shot:


Closer up:


And, lets not forget the Robin's Nest with the 3 eggs in it that is in the same exact place every year!


What's a great sitting area without some mood lighting??


We spent that weekend also planting bunches o' flowers so since they are so pretty and I finally fixed my camera, I'll take you on a tour:

The side fence that is our property line:  (we would never fence in this area...who in their right mind would block those gorgeous wetlands??)


Go ahead, be jealous, that hydrangea bush will bloom hot pink flowers by the beginning of July!  While I'm at it, might as well check out the front yard:


In a few weeks, those petunias will practically cover the flower bed and they will live ALL.SUMMER.LONG!  Yes, that's another hydrangea bush to your left!  Here are my pots o' flowers:


Some up close:


Can't forget my little welcome birds...


Excusing the trash and recycle bin to your left, here is a shot of the deck and patio:


Whew, we've been busy!  But, gotta remember, outdoor spaces are just as important, especially this beautiful time of year!

Sharing at:


Thursday, May 10, 2012

A new coffee table!

Well, not for me, but for someone!  I originally bought this with my mom in mind.  She needed a new coffee table and I knew this had good bones.  Her new dining table has the dark stained top and white legs, so I thought it would go nice.  She really like it, but unfortunately it's a bit too big for her small apartment.

This was it before:


I found it at Goodwill hiding behind a few other tables.  The leg was wobbly, the top was dirty and the color was just blah.  But, I loved the wood slat look on the top and knew it would be great stained darker.  So, I stripped off the top:


I got out my new favorite Rustoleum Dark Walnut Stain and some ASCP in Old White. I also fixed the wobbly leg, turns out a screw was just loose.  Boy, I know the feeling... Check out this pretty top now:


And, the whole table, which really looks completely different!


I'll have some great pictures for you this weekend, I know I've been MIA for a while again, but I've been super busy fixing up my outside spaces!  Let's just say it involved flowers, LOTS of stain, a moment where I got to prove myself RIGHT to my husband and a little homemade pallet table on wheels!  Stay tuned...