OK, seriously, I almost forgot my password when logging in because it's been SO long since my last post. Sorry. What can I say? Life is busy! Now, onto the good stuff...
The same friend who I did the armoire/nightstand/desk makeover for decided she needed something for her son's room. We kind of talked about it on and off, but not too seriously, then she came into my office one Monday morning telling me of her trips to local furniture stores. Can you say expensive?! So, give me the green light and I'm a lady on a mission! The same day I was taking a long walk during my lunch hour and just happened to end up in front of the Habitat for Humanity Restore. (just happened, right?) I walked in and instantly knew I found what she would end up buying. I went back to work and drug her to the store after work. Sure enough, she agreed. She not only purchased this dresser and armoire, but also a great loft bed frame. Unfortunately, I can't shove that much furniture in my house so I did these two pieces first and now I have the bed to start.
My first thought upon seeing this set is that it was the typical 80's orangey/oak set. It's SUPER heavy, solid wood.
Because the dresser was outside before I realized I needed a before pic, it doesn't truly capture the oranginess (real word?) of it. Then, as I was dragging pulling the dresser around, I saw the stenciled stamp on the back that says this set was made in April of '94!
We went back and forth with color options, then settled on brown. Then, she decided olive, which I have to say intrigued me. I hurried and pulled up the color samples of ASCP on my computer and low and behold, OLIVE! It's pretty dark so I mixed the Olive and Old White to tone it down a bit. We knew from the beginning that the tops would be stripped and restained a nice dark walnut. Here is the dresser top before:
Notsogood, huh? I got out my orbital sander with some 80 grit sandpaper and after about 30-45 minutes of sanding (I thought it would never end!) I got this:
Ready for stain! So, I'll admit, I'm not an expert stainer, that's why I've pretty much reserved staining for long straight spaces like this. I'm sure I'll branch out eventually, but for now, I can still pretend I know what I'm doing!
The pulls that were already on these pieces were actually quite nice, so we decided to reuse them. I was going to spray them a flat black, but noticed this at the Hardware store:
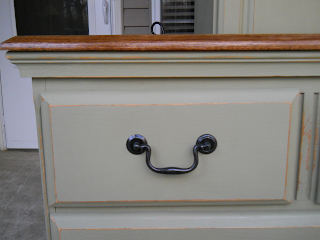
It's just what I wanted, it's only a slight difference, but it adds a bit of texture, which is great for a piece I was trying to make a bit more masculine. I just bought some very simple dimpled black knobs for the armoire doors. I think you can tell from this close up:
And, voila!
I can't stop looking at them!
I'm going to digress a bit for anyone who is new to using the ASCP. Do not freak when the colors are a bit different as you first paint. I mixed two ASCP colors to what I really liked. As I was painting, it looked really bright, almost a sage green. I was getting nervous. But, it dried darker, just as I had imagined. Then, as I sanded down everything, there was a whitish hue all over from the sanding. My husband thought I had ruined it, but I knew I still had the last step, the wax. I had actually decided that I would probably have to add some dark wax after the clear wax to darken the color, but as the wax went on I realized the color was perfect. The wax really deepens the color and just provides another dimension. Yes, I sand before waxing, some say you shouldn't, but I do. So there. hehe Not to mention, smooooooooth. Super smooth. Honestly, it's hard to tell it wasn't factory painted by the feel of the finish.
And, after 3 coats of stain, waiting at least 6 hours in between and rubbing down with a piece of steel wool each coat, check out the new finished top:
And, just some more for your viewing pleasure:


they look beautiful rebecca! i really love the refinished top on that dresser- nicely done!
ReplyDeleteIt looks amazing - what a difference the finished top makes - love it!!! I would love for you to come by and link it up at my Creative Inspirations Party and Embracing Change going on right now! I would love to have you there!
ReplyDeleteStacey
http://staceyembracingchange.blogspot.com
I LOVE how these turned out! Great job!! I am stopping over from Primitive and Proper. I am your newest follower. Stop by sometime!! -Sarah
ReplyDelete