Tales of my furniture makeovers and great DIY projects...

Wednesday, February 29, 2012

My new TV stand/Media Center

I recently (finally!) got a new couch and chair/ottoman for my living room.  They were a long time coming.  We were using my mom's old loveseat and chair for the past few years.  They did the job, but I just wanted to actually be able to LAY down on the couch if I wanted to.  Since then, I've been on a mission to redecorate the whole room. 

So, I went to a local decorater tag/barn sale and, of course, found tons o' stuff I wanted.  I ended up getting a really good deal on an old dresser and 2 other pieces that I'll write about later.  I knew from the beginning I wanted to turn the dresser into a TV stand.  So, in my true fashion, I had to get started RIGHT AWAY!  Ahhhh, when will I ever learn the art of relaxation and taking my time??

I almost forgot my before shot, so here she is, not the best angle, but hey, it's something...


It's actually in good shape for as old as it is.  It does have a pretty bad paint job though.  Although you can't really tell from this picture, the paint is chipping and peeling.  That pink tinge you see on top is the paint stripper.  Like I said, I "almost" forgot my before pic!  I'm in love with the wood top/painted body look so that is the route I took.  Well, I have to be honest.  Stripping is messy.  Stripping is a pain in the a$$.  OK?  So, as far as I'm willing to go anymore is a nice straight top, not the full thing!  It had several layers of white paint, this is the best I could get with 2 rounds of Citristrip:


The edges came out nicely, but I had to enlist the help of my orbital sander for the top.  It worked great.  It's not perfect though, it has marks and dings and isn't a shiny piece of new looking wood.  But, then again, I don't want it that way anyway, right?!

I painted it Louis Blue in ASCP, heavily distressed it, then topped with clear wax and dark wax.  The very small amount of dark wax I used really gives it an aged look.  A lot of the white came through also, I originally didn't expect that, but it looks like I meant it that way.  One thing I did do purposely was to paint very lightly over the inlay design on the drawers so the white outlines it and gives it a pop.

I didn't put the top two drawers back in to allow a space for the DVD player and the DirecTV receiver.  I originally wanted to cut the drawer tops off, then replace them with a hinge to be able to pull them down and click back in place when the TV wasn't in use, but the drawers are dovetailed and I didn't think that would work.  So, I removed the big piece of wood running down the middle of the inside and opted to not paint in there.  You can see some of the wood, but that adds to the rustic feel, well, at least I think so!  I made holes in the back to allow the cords to go through:


Finally, I had to find knobs or pulls.  The dresser didn't come with any so I couldn't reuse or repaint.  I had always had in my mind that I would put some pretty glass knobs on the drawers.  There is a store downtown where I live that sells bigger sized ones which I thought would be perfect on these big bottom drawers.  When I went there, I came across a basket with a bunch of old pulls.  Would you believe there were only 4 of these in the whole basket?  Would you believe that I only needed 4??  I never have that much luck!  I did pay more for these than I normally would, but I'm not selling this, so I don't need to worry about profit margin, just what I like!  Aren't they just beautiful:


My flash must have been on crack when I took this pic because they really don't look this gold colored.  Look how pale this Louis Blue looks also.  Photography is just not my thing I guess.  They've aged well, so I didn't do anything to them. 


I've decided it's my mission to convince the world that everyone needs a pop of blue to brighten up a room.  It's just so happy. 

We were going to mount the TV on the wall and have this directly below, but I think it looks fine the way it is.  No point in spending more money and drilling more holes in my wall, huh? 


Just look at that dark walnut top.  I'm so pleased. 

The only issue we are having is with the wheels.  I believe it would be a crime against the furniture Gods to take those rustic, pretty, vintagey (now I'm just making up words)wheels off.  My husband wants them off.  Because of the age of this dresser, the drawers are not super easy to open and with the wheels, the dresser does move when yanking at them.  He is afraid that Emma will yank one of the drawers, the dresser will jerk around on the wheels and the TV will fall.  I'm still not sure if it's the TV or Emma he is trying to protect, but whatever.  I suppose it may be a legit complaint.  So, I'm going to try and sand the edges and wax them down in hopes that the drawers will open smoothly and I can keep the wheels.  Any other suggestions if that doesn't work??


Sharing at:


Friday, February 24, 2012

A quick craft

I first need to give credit where credit is due...I found this idea on Pinterest, here is the direct link to the blog it came from.  With a ton of ideas all around the internet, no "craft" project really belongs to one person, however, giving a shoutout for a great idea and a tutorial like this is only right when using it on your own blog.

I've long admired those wooden painted signs with clever sayings or names on them, especially the more rustic ones.  I've had my eye out for a really beat up plank of wood to do it on and actually found some, but time got away from me and couldn't go pick them up.  So, a quick stop at Lowes got me these type of boards:


Actually, this was one board I had cut into 3 pieces.  I think the whole slab of wood was, um....about $4.50! 

Earlier in the day, I decided I was going to use my friend El as my guinea pig, even though she doesn't know it yet.  Well, maybe she does if she reads this before I see her tomorrow.  She has twin boys who are almost exactly one year younger than Emma, so I thought it would be neat to test this out using thier names in opposite colors.  So, I got on the computer and found a font I like, blew it up to about 150, then printed them out.


I painted one board ASCP Graphite and the other Old White, just one coat.  After it dried, I took my ballpoint pen and traced over the letters on the wood.  After finishing this, my suggestion would be to press REALLY hard to get a nice dip in the wood to avoid some of the mess I made.  Can you see the outline on this:


Make sure you click on the pic to make it larger, but I can see it on my screen, hope you can!

After tracing onto the wood, I  painted in the letters in the opposite color:


Although at first glance the letters look pretty good, it's a bit messy.  I would suggest getting a very thin strong paintbrush for the letters, not raid your little one's art supplies, like I did!  So, what's a girl to do when her paint is a bit messy??  Distress it of course!  The sandpaper helped me sand away some "oops" lines, especially since it was ASCP and I only used one coat.  Although I wasn't planning on it, I got out the wax because after sanding, the Graphite gets a whitish hue all over it and needs to be spruced back to life.  So, after the clear wax, I gently brushed on dark wax and quickly wiped away to just leave a small trace of it.  I'm so glad I did that because it really aged the look it since I couldn't go buy my pretty piece of already aged wood.  Here they are finished...not bad for my first try, huh?


Since my crappy camera ran out of batteries AGAIN, these are all taken with my cell.  I really hope you can tell the difference between the last two pics!

Saturday, February 18, 2012

Finally...furniture makeover for a BOY!

OK, seriously, I almost forgot my password when logging in because it's been SO long since my last post.  Sorry.  What can I say?  Life is busy!  Now, onto the good stuff...

The same friend who I did the armoire/nightstand/desk makeover for decided she needed something for her son's room.  We kind of talked about it on and off, but not too seriously, then she came into my office one Monday morning telling me of her trips to local furniture stores.  Can you say expensive?!  So, give me the green light and I'm a lady on a mission!  The same day I was taking a long walk during my lunch hour and just happened to end up in front of the Habitat for Humanity Restore.  (just happened, right?)  I walked in and instantly knew I found what she would end up buying.  I went back to work and drug her to the store after work.  Sure enough, she agreed.  She not only purchased this dresser and armoire, but also a great loft bed frame.  Unfortunately, I can't shove that much furniture in my house so I did these two pieces first and now I have the bed to start.

My first thought upon seeing this set is that it was the typical 80's orangey/oak set.  It's SUPER heavy, solid wood.


Because the dresser was outside before I realized I needed a before pic, it doesn't truly capture the oranginess (real word?) of it.  Then, as I was dragging pulling the dresser around, I saw the stenciled stamp on the back that says this set was made in April of '94!

We went back and forth with color options, then settled on brown.  Then, she decided olive, which I have to say intrigued me.  I hurried and pulled up the color samples of ASCP on my computer and low and behold, OLIVE!  It's pretty dark so I mixed the Olive and Old White to tone it down a bit.   We knew from the beginning that the tops would be stripped and restained a nice dark walnut.  Here is the dresser top before:


Notsogood, huh?  I got out my orbital sander with some 80 grit sandpaper and after about 30-45 minutes of sanding (I thought it would never end!) I got this:


Ready for stain!  So, I'll admit, I'm not an expert stainer, that's why I've pretty much reserved staining for long straight spaces like this.  I'm sure I'll branch out eventually, but for now, I can still pretend I know what I'm doing!

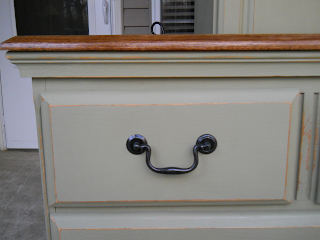
The pulls that were already on these pieces were actually quite nice, so we decided to reuse them.  I was going to spray them a flat black, but noticed this at the Hardware store:


It's just what I wanted, it's only a slight difference, but it adds a bit of texture, which is great for a piece I was trying to make a bit more masculine.  I just bought some very simple dimpled black knobs for the armoire doors.  I think you can tell from this close up:


And, voila!


I can't stop looking at them!

I'm going to digress a bit for anyone who is new to using the ASCP.  Do not freak when the colors are a bit different as you first paint.  I mixed two ASCP colors to what I really liked.  As I was painting, it looked really bright, almost a sage green.  I was getting nervous.  But, it dried darker, just as I had imagined.  Then, as I sanded down everything, there was a whitish hue all over from the sanding.  My husband thought I had ruined it, but I knew I still had the last step, the wax.  I had actually decided that I would probably have to add some dark wax after the clear wax to darken the color, but as the wax went on I realized the color was perfect.  The wax really deepens the color and just provides another dimension.  Yes, I sand before waxing, some say you shouldn't, but I do.  So there.  hehe  Not to mention, smooooooooth.  Super smooth.  Honestly, it's hard to tell it wasn't factory painted by the feel of the finish.

And, after 3 coats of stain, waiting at least 6 hours in between and rubbing down with a piece of steel wool each coat, check out the new finished top:


And, just some more for your viewing pleasure:


I think it's very masculine, perfect for a boy's room, not only as a young boy, but can really grow with him for a long time.  What do you think??

Sharing here: