Tales of my furniture makeovers and great DIY projects...

Sunday, November 11, 2012

Islands in the Stream....um, I mean kitchen!

I did this project a while ago, but thought it was time to share considering all of the work I've been doing on my kitchen lately.  When originally deciding what I wanted for the kitchen, I knew I wanted the two colored cabinet look.  I decided an off white/black combo would be nice and still neutral enough.  I started with the island.


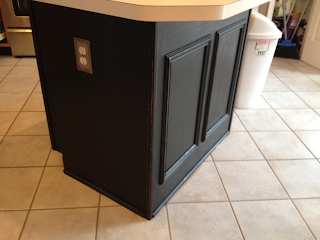
Your basic contractor cheapy island, huh?  Well, replacing it was out of the question, too expensive!  I knew painting it would cover that awful particle board on the sides and back, but wanted a bit extra, you know, I wanted it to look like a piece of furniture.  So I added these moldings I bought for about $8 at Lowes.
 
 
As you can see, I already taped around the bottom so I wouldn't paint my ceramic tile!
 
I'm a HUGE fan of the Annie Sloan Chalk Paint.  I now use it for most of my furniture redo's.  I'm also currently using it for the rest of my kitchen cabinets.  However, they don't make black.  The closest they come is a Graphite, which is dark gray.  When topped with the dark wax, it does make it look much darker, but not black.  Then I heard about Maison Blanche Paint Company and their chalk paint.  And, they have a true black! 
 
 
It's just as expensive as ASCP except I couldn't find anywhere near me where they sold it, so I also had to pay shipping.  This paint has the same concept of ASCP, no sanding or priming necessary.  However, I still sanded down the island just to get the gloss off.  When I put the first coat on, I have to admit, I was disappointed.
 
 
See what I mean?  It's hard to tell from the picture but the paint just sort of sat on the cabinet, it didn't soak in or "grab" like I was used to.  It also most certainly wasn't black.  But, I trudged on because I know by now that a lot of times while I'm painting something I have to keep in mind it isn't the finished product.
 
Please keep in mind that I'm not some trained professional with decades of paint training (if there is such a thing!).  However, I know what I like and what works for me, so that is what this is about, just my experience.  Although ultimately happy with the finished look, I was not impressed by the paint at all.  It took 4 coats.  Yup, 4.  It just did not stick they way the Annie Sloan paint does.  After it completely dried, I sanded the way I usually do to lightly distress.  It flaked and peeled, much like latex.  It did not powder off the way ASCP does for a more natural finished look.  I also had to finish with dark wax, which did bring the color to black, kinda an off black, but black nonetheless.  I could have saved myself about $40 and used the MyPaint by Pantone in black that I used for my bathroom cabinets.  And, in the future, that will be my "go to" black. 
 
I won't keep you wating with my complaining any longer, here it is finished:


And, now with the new counter tops:
 
 
Here is a shot that will hopefully show what the finished kitchen will hopefully look like.  I love the black island with the off white cabinets.  And, one day when I finish the cabinets, we will be putting up a backsplash.  I've decided on a white subway tile.  The counter tops are kind of busy so I wanted something very plain next to them.  And, the good news is that I found BOXES of the tile at the Habitat for Humanity Restore for cheap, cheap, cheap!
 
 
Sharing at:


Thursday, November 8, 2012

A great vintage chest!

See, I told you I was back, this makes 2 posts in 2 days!  Over the next few days, I thought I'd show you all some projects I've been working on for my space at Ginger & Spice.  I'll also be keeping you posted on the kitchen redo!

I found the great chest of drawers a while ago.  It sat and sat because I just wasn't sure what to do with it.  The wood was really banged up and it needed to be painted, yet I hated to cover up all that great detail work.


The drawers...


Sorry about the before pics, I started in on this before I realized I forgot to take some pics.  See all that great detail, not only in the carvings, but in the two toned wood? 

I finally decided to just make two toned paint.  I mixed up some ASCP Graphite and Old White and came up with this beautiful grayish blue color.  I painted the whole thing in ASCP Old White, and, by hand, accented all the detail in my fancy new color.  I then sanded and sanded to make it very distressed and chippy, then topped with a coat of wax.


I also spray painted the knob an oil rubbed bronze to make them really pop!  Here is a view of the top, look at all that detail!  (and, notice my pretty pillows in my space as well!  :))


Hope you like it!

Sharing at:


Wednesday, November 7, 2012

I promise, I didn't fall off the face of the Earth!

Really, I didn't!  See, I'm here!

I'm sorry for my absence.  As most of you can appreciate, I've been crazy busy.  Something had to give.  Unfortunately, the blog was it. It was either that or a little 4 year old girl.  I've just been pulled in so many directions lately that I had to do something. 

But, I'm here now!

I've got a few projects to share also in the next few weeks, so stay tuned!

For now, I'll give you a few pictures to show you what I've been up to.  We are s-l-o-w-l-y redoing our kitchen.  I finally saved up enough for counter tops, then the water heater broke.  Luckily, we were able to replace it without cutting too deeply into my counter top fund.  But, although it probably wasn't the best financial decision, I knew that my fund would slowly dwindle to other things, so I got my a$$ in gear and finally picked out tops!  Here is a before pic of the beautiful laminate tops I had before:


My vision was light cabinets and darker colored tops.  Don't ask me why, but I'm on a gray kick lately.  It's my new neutral.  Unlike a brown or tan, it goes with any crazy color I decide to use!  So, I got a grayish/blackish granite top.  I also started painting my cabinets.

(This is where my Public Service Announcement comes in...) If you ever decide to paint your own cabinets, allow at least 10x the amount of time you think it will take, then triple that!  I've done 2 small sections, the top row hasn't even been touched.  However, I'm glad I decided not to tackle it all at once.  I used ASCP Old White.  I did sand though after a good cleanin'.  I didn't want any of the sheen to come through.  I then topped with clear wax, dark wax, then clear again.  So far, I love, love, love them.  It will just be a lot of work to finish them.  A LOT.  A LOT.  You hear me?  hehe

So, here is the sneak peek:


Excuse my lack of staging and the mess you see.  I'm doing the best I can!  Whatcha think?

And, here is a quick before/after of a great bench I bought while hitting the yard sales with Cassie, blogger extrodinaire!


Just blah, but great storage!  I painted one coat of  Pantone MyColor paint, then distressed so the red really came through.  I topped it with a coat of wax and it's so smmmmmmooooooth!


It's at Ginger & Spice, so if you like it, go buy it!  hehe

And, finally, I want to share something else with you that is at the store.  I did not paint this. Contrary to what some may think, I love the look of natural wood.  I came across this mantle while picking up some furniture I bought from Craigslist.  The guy made a remark about throwing it in the burn pile before I grabbed it and ran.  Shame on you!  This thing, in the burn pile?  Oh, the humanity...


I've scoured every room in my house for a wall where this would fit.  Twice.  I can't work it out, so it's at the store, come visit!

Sharing at:


Monday, October 1, 2012

A quick redo and my first complaint!

Ack!  I forgot before pictures.  My mind is mush.  Seriously.  I will be more organized.  I will be more organized.  I will be more organized.  Believe me?  Not sure I believe myself.
 
I picked up this great Queen Anne style dresser from Craigslist.  It was in GREAT condition.  VERY heavy, dovetailed drawers still lined up straight.  The wood was beautiful, except the sides.  They were all scratched up.  So, I left the top as is instead of having to strip and restain myself.  I brightened it up with some Scott's Liquid Gold.  (and had flashbacks of my Grandmother making me use that to wipe down her paneled walls)  Then, I grabbed the Louis Blue and painted away!
 
I used the same drawer pulls, however they were in two pieces, the backing was that ornate flair kind that you see on every piece of Queen Anne style furniture.  But, these were different, they also had these handles that were seperate.  So, I just stuck these quaint handles back on without the backing.  Much better. 
 
 
Look at those great legs!  If I could whistle I would, but I can't.  Don't make fun of me!
 
Moving on to my first complaint from no other than my 4 year old.  I made this wooden sign for her a while ago when I first started dabbling in making signs:
 
 
I think it turned out great.  Well, she promptly told me that it is NOT allowed to be hung in her room because that is not her name.  Um, yes it is.  And, you can write your own name, so what's your beef?  Well, folks it's the "a".  That isn't the way to make an "a".  I tried to explain to her that it was a fancy way of doing it.  She didn't buy it.  Anyone out there have an Emma?  Want a sign?
 
Sharing at:


Thursday, September 27, 2012

Signs, signs and a table!

Whew.  What a busy week.  I had SO much to do this week.  So, of course, I was sick for two days, isn't that the way it always happens?  But, luckily I was a workhorse over the weekend and finished some projects. 
 
I had the hankerin' to make some wooden signs.  But, I was just blah about the "perfect" slabs of wood I was buying at Lowes.  I went to my local connection for pallets and began ripping them apart for my not so "perfect" slabs of wood.  I made these great signs for my space.  I'm still struggling with small stuff and signs are fun to make and I hope people like them!
 
 
Because this wood was bumpy my previous method of tracing REALLY hard with a ball point pen didn't work so well.  I ended up rubbing chalk all over the back of the paper that I had printed my letters on, then lightly tracing over them with a pen.  Worked like a charm! 
 
Along those same lines, a friend of mine has been wanting me to  make her and her husband a wooden sign that has their last name and year they were married.  While shopping at the Chartruese barn sale this weekend, I spotted some fabulous old wooden baking trays. I knew it would be the perfect thing to make a simple wall hanging, but also could be taken down to use as a tray.  My only regret is that I didn't buy like 20 of them.  Maybe they will be there next month also.  One can hope, right?  I used the chalk transfer method and just used some ASCP Granite for the lettering.  I screwed two drawer pulls on each side and ta-da!  I love how simple and rustic it is.  I really wish you could see all the detail in this wood, that's why I didn't paint the backround.
 
 
I want one.  Or, maybe we could just change our last name to Smith?  How awesome will this look hung on a wall?  Luckily there is a lip in the back perfect for a nail!
 
I also wanted to share a new (to me!) color.  I don't have any before pics of this table, cause, well, I forgot.  This color is ASCP Florence.  I LOVE, LOVE, LOVE it.  I will be painting something in my living room this color.  So, my husband and daughter better not sit still too long!
 
 
This is one coat of paint, yup, that's right, ONE.  I topped it with a clear wax.  I really want to use dark wax over this color, I think it would be even more magnificent, but I thought this table was too feminine and pretty for all that jazz.  Plain and simple is my motto this post!
 
Sharing at:


Monday, September 24, 2012

Mini Sideboard

Okay, I'm sure it's probably just called a small buffet, but it's so cute, it's mini sized! 
 
I picked this up from a lady who had been storing some extra pieces in her basement that her in laws had given her and her husband when they first got married.  She just wanted to clean out the space and really couldn't figure out why I like this.  She said, "but, it's just so old!"  Ummmm, duh!  That's what makes it great!
 
 
Well, yeah, it's a bit tired and scratched up, but it just needs some refreshing!
 
I sanded the old stain off the top.  Sometimes I strip and stain, other times I just try and see how easily it will sand off.  This was one of those easy days and it worked!  I used some 80 grit paper and my orbital sander and had the top and sides sanded down in about 10 minutes.  No messy stripper, woo hoo! 
 
I couldn't decide what color, I wanted an off green so I bought a sample size of ASCP Country Grey.  It has a very green tinge to it.  But, it was TOO greeny for this, I still wanted something neutral, so I mixed it with some ASCP Old White:
 
 
I stained the top my go-to stain, Rustoleum dark walnut.  I  rubbed on one coat with some rags, waited for it to dry, then top off with some ASCP Dark Wax......beautious!
 
 
I think there is something wrong with me.  Pretty stained wood like this just makes me happy.  Sigh. 
 
I painted the rest in my custom color mix, 2 coats, then distressed by hand and topped with Clear Wax.  I rubbed a very small amount of dark wax on the bottom detailed part to make it really stand out.
 
 
Look at those pulls, so fancy!  And, the wooden decorative piece on top just finishes this off.  Of course, once again, I want to keep this.  But, she is going to my space at Ginger & Spice in hopes that everyone will be in the buying mood during the Fall Festival this Saturday.
 
If anyone is local, come on out, it should be a great time.  There are now 20 vendors.  I'm hoping I can sell some stuff because I know I'll want to buy everything I see also!
 
 
And, because it's so pretty, another picture:
 
 
Hope to see you at the Festival!
 
Sharing at:


Monday, September 17, 2012

I picked a color!

In my last post, one of my burning questions was...what color should I paint these stools?????
 
 
Sorry, these are my only before pictures.  I had been looking everywhere for stools with a back that also weren't too big as my table sits behind and to the side of the island.  With big chairs it kind of caused a traffic jam.  I had been using saddle style stools, but was always afraid my four year old would go tumbling back on my hard ceramic tile floor.  I found these at a consignment shop and they are the perfect size and shape.  The color, blah.  It's that light blond wood, or blah wood.
 
Since my island was just painted and distressed black, black was out of the question.  My cabinets will be painted Old White and we are getting neutral counter tops.  The walls will be painted the same gray you may see peeking through in the living room.  I just went with my old standby, ASCP Louis Blue.  One coat people, yup, thats right, one coat.  Best of all, the seats screwed right off so I didn't have to be careful:
 
 
I lightly sanded and waxed them.  I think they POP off the black and will really go well with the gray paint.
 
 
Wow, my lighting is really bad.  Hopefully, some of you will know what Louis Blue is like.  If not, it's in between the picture with the seats off and this one. 
 
I can't wait to finish my kitchen!
 
Sharing at: